I print many of my digital photos and display them all over my home and office. I highly encourage my photography clients to print their photos as well. However, as a part-time photographer who works full-time in a different profession, my time is limited. Because of this, I have chosen to use an all-inclusive business model where my clients receive digital images.
As a customer, I want to receive a digital package when I hire a photographer, so that’s what I want to offer my clients. Having digital files allows my clients to archive their images and gives them flexibility in printing. However, the all-inclusive business model does have negatives. One challenge is protecting image integrity when the printing process is out of my hands. This is why I’ve invested so much time in learning the best way to optimize digital images for print.
Here’s how I prepare and deliver digital images to clients without compromising my photography in the process.

1. Optimize your digital images for printing.
With an all-inclusive model, I am sacrificing complete control over print quality. While I can’t size and sharpen each file for the print being ordered, I can take steps to optimize the files for a typical print situation. I love large prints and wall art, but I know that the majority of my client images are printed in smaller sizes on glossy photo paper, or used in photo books and albums. Here’s how I prepare digital images for delivery to my clients:
Image size
I deliver full resolution files and my print release allows my clients to print up to any size. The files from my Nikon D850 are more than adequate to print on a billboard if they really wanted. But, while increasing size for print can compromise image quality, downsizing images can also have an effect on the image (though it’s usually imperceptible). Because of this, I tell my clients that I cannot guarantee the quality of their prints larger than 8 x 10-inches if they do not purchase them directly through me. Not even if they order through their ShootProof gallery.
Aspect ratio
Most cameras have a native aspect ratio of 2:3, but prints come in a range of aspect ratios. In my printing guide, I explain how different aspect ratios will affect the final image. One way I safeguard against cropping is by delivering images with a 11:15 aspect ratio. The ratio sits almost exactly between the most common 2:3 and 4:5 ratios. This means that all prints will have to be cropped a little but no prints will have to be cropped a lot. When I shoot, I also like to leave space in the frame to allow for customer cropping as well as the possibility of a wrapped canvas.
Whatever aspect ratio you choose, make sure you’re cropping to a ratio and not a specific print size. Crop to a 11:15 ratio not 11 x 15-inches or your file sizes will be limited.
Sharpening
I sharpen every photo I print for the specific size and print medium. This is not an option with delivering digital images to clients. This is another reason I do not guarantee prints over 8 x 10 inches if not purchased directly through me. While I apply a light amount of sharpening on all image exports, that amount of sharpening is only acceptable up to a certain print size.
File type
Files delivered to clients should be in JPEG format. I generally leave my export quality at 12 (Adobe Photoshop) or 100 percent (Adobe Lightroom), but anything over 10 (Photoshop) or 85 percent (Lightroom) is perfectly acceptable to deliver to a client (and the file sizes will be more manageable).
Color space
Most professional labs and all consumer labs utilize sRGB color space. The files you deliver to a client must be in sRGB color space. While many sites won’t allow you to upload file types other than JPEG or TIFF, labs won’t look at the color space embedded in the image. This means that if the image is in a color space other than sRGB, which the print labs are calibrated to, the colors of the resulting print will be terribly off.
I edit on a calibrated monitor and have printed at both Miller’s Professional Imaging and Mpix. I know that the print color matches the color on my editing monitor. My print release states that, while color should be acceptable printed anywhere, I am only able to guarantee a color match through my chosen labs. I’ve worked with these labs for several years and know that if for some reason the color isn’t right, I can work with them to make it right for the client.

2. Consider offering print fulfillment through a gallery platform.
I deliver client galleries and digital images through ShootProof. Through this platform, clients can easily download digital images and order prints from a professional lab. My chosen lab for fulfillment is Miller’s Professional Imaging. While my clients may order prints anywhere, I encourage them to order through their ShootProof gallery so that I know they are getting high-quality prints.
Since my clients have the option to download their digital images and print at any low cost printer, I price my ShootProof print option using a low-cost, high-volume model. Once the gallery is uploaded, there is little work to do on my end, so I am able to place a much smaller markup on prints. This makes it a great option for clients while creating a little extra cash flow for me at the end of the session. It’s still not ideal, as I’m not able to hand sharpen each image for the selected size and print medium. But, at least least this way I know the images are being printed through a trusted lab and that the quality and color will be top notch.

3. Educate your clients on how to print digital images.
Photographers understand that image sharpening is important and that not all images are suited to all aspect ratios. Clients do not know these things. It’s our job, as photographers — whether we sell prints or use an all-inclusive digital model — to educate our clients on how these elements affect the final images. Clients don’t need a thesis on the how and why, but they deserve a brief education if they are investing their money. They need to know why images printed on matte paper are sharpened differently than images printed on glossy paper, canvas or wood. Or, why they can’t crop a group photo to a 4:5 aspect ratio without losing Uncle Jim and Aunt Linda off the sides.
When I deliver a client’s digital gallery, I also send a link to my print guide. In this guide, I explain the differences between professional and consumer labs. By educating them on the differences, I hope they will make a good decision with their investment and use my preferred consumer lab, Mpix.
My print guide also walks through some basic information to help clients prepare their digital images for print. I show a visual representation of how different crop ratios affect an image, touch on the importance of sharpening and briefly cover cropping and photo papers. I also state that no alterations, aside from standard (not creative) cropping may be made to the images. This information helps protect my art because if a client is not printing directly through me, I want them to receive the best possible prints they can get.
Pro Tip: outline terms and conditions in your print release.
My print release not only allows the client permission to print their images, but outlines basic terms of use. For example, I make sure clients know that their use is limited to personal purposes and that I retain copyrights to all images.
Why I recommend Mpix
There are plenty of consumer print labs available with good print quality. But because I have been a Miller’s customer for years — and I trust them completely with my images — I recommend their consumer lab, Mpix, to my clients. Even if my clients don’t order through me, I still want them to receive great prints.
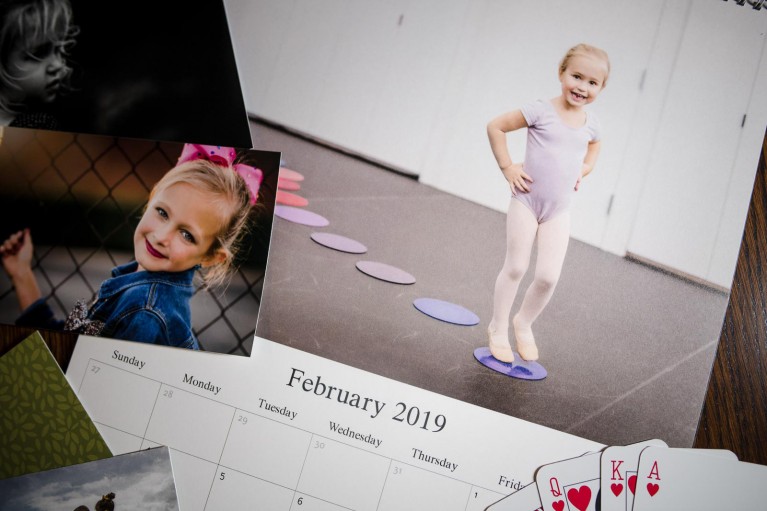
Aside from great prints, Mpix also offers a huge variety of products, which I know appeals to my clients. I order their unique products for my own family as well. My daughters think it’s so cool that they have playing cards with their picture on them! I also make an annual calendar for my family and print it at Mpix.
The Mpix website is also very user friendly. You can import photos from your computer, straight from social media, like Facebook or Instagram, or other cloud storage options such as Dropbox, Google Drive, and Amazon.
Mpix is as easy and convenient as the lower budget print labs — if not easier — and the quality far exceeds those other labs.


Pricing digital images
I currently offer just one all-inclusive package for portrait sessions. I’ve tried a tiered pricing model that included varying amounts of digital images, but I didn’t have the time — or, let’s be honest, the patience — to manage the image selection process. I also hated seeing my favorite photos not selected and left to die on my hard drive. I’d rather my clients have the full gallery of all of the edited digital images. Just remember when pricing your all-inclusive packages to consider all of your costs and the profit you need. Since you won’t be making additional income from selling prints, you’ll need to price your digital packages accordingly.
I love the ease of an all-inclusive model for my photography business and clients love receiving digital images. With this system, I have to be willing to sacrifice a certain amount of control over the final printed product. But, I feel confident that I’ve optimized my digital images to the best of my ability before delivering them to the client. The integrity of my work is important to me. I want to protect my art, my business and my clients from receiving substandard products. I hope my system of optimizing digital images for print is helpful to you in your photography business.
Images by Kate Luber
Just how important is a great print lab?
OK, so you’ve prepared your digital images and provided recommendations. But, there are still going to be clients who choose to print at their local kiosk or one-hour photo stand. “Why oh why,” you scream silently the next time you walk into their house and see that paper envelope or photo book sitting out. Well, some clients just don’t see color and contrast differences like you do. Unless… what if they could see those differences side by side? We’re so glad you asked! Here you go… Click’s print lab showdown compares four budget printers with a pro lab. Trust us, you’ll want to send this to every client.
You might also like these articles on the importance of printing:
Whoa…….someone in a group recommended the “11×15” which is something I hadn’t heard in years…….so I did a search to see if that idea was spreading.
It’s really not, and there are REALLY good reasons.
One, its an unnecessary bunch of extra work, that only ensures that not ONE picture for ONE customer will be printed EXACTLY the way you compose it. Not one.
But it’s worse than that, because your first step is to throw away 9% of your image quality…it’s just gone. You can’t ever get it back.
THEN, in pretty much every scenario, the customer will throw away ANOTHER chunk of image quality, no way around it. In fact, now the 8×10 becomes the LEAST destructive shape, only costing you 16% of your image quality…..but the 4×6 you started with…..and every variation of that aspect ratio, costs your poor photo 18% of your pure image quality.
That’s before you consider having lost even more to a crop for artistic reasons…..it’s just 18% of the quality GONE.
And really…..it’s gone for no real gain. Just recommend customers use GOOD aspect ratios, and leave your files at 3:2 like 99% of the pro photographers do.
I tell customers “these images are not intended to be 8×10, if you WANT 8x10s, let me know, I’ll make you a special file” That happens like 3 times a year.
Or create specific aspect ratios for ARTISTIC reasons, not compromise/safety net reasons, and TELL your customers what sizes to print them.
11×15 is just NOT a good idea.
Hi Kate ,
Thank you for this article. I’m new to dslr photography. Because of covid and my autoimmune conditions, as well as having a baby when it all started , I decided to take up a new hobby. It started with photos I took at the beach from my iPhone. I tweaked them a both through my phones editing and instagram and they turned out great. I shared them with my MIL. She loved them so much she asked me to take pics at her wedding. So then o had to hit a new camera. I got a Nikon d5600. I am using Lightroom app on my phone just for now and have the subscription. But I’m having cropping problems. I wanted to turn the wedding photos from her wedding into an album for her. So I went to Walmart and printed them from the machine because I wanted to test run the format I saved them back into the SD card as which was “tiff”. But Walmart’s machine has an auto cropping feature you can’t shut off . It botched a lot of my photos . It was either have body parts cut out and do their crop suggestion or it was leave them the way I had them and have thick white boarders to cut off the what was supposed to be a 4×6 photo. I custom cropped them in light room. Some I didn’t even crop at all. Some of them came out fine and stay true to 4×6 and some of them turned out where I had to cut boarders and shrink the size of the actual print. Was this a Walmart machine issue , was it something I did during my edit or was it something I messed up doing my shot ? This was free for her so I didn’t make any profit off it because it was more of a practice thing for me . But could you please give me some insight on what I did wrong? I am also taking an online digital photography class through Alison to try to get better. Thank you for your time and your article. Your work is amazing .
I am a newbie and just got my Shoot Proof pretty much set up. So, if I understand right, I choose “Custom” when I crop in Lightroom and the boxes pop up and I type in 11 and 15 in those boxes? So, 11X15 is what it looks like. Then, when I export, I export at 100 percent and 300PPI, and I don’t have to add any long edge or anything else? Then, my clients can print whatever size they want. If they print a 20×30 canvas, the can do so through Shoot Proof ( I have it set up as MPix as my preferred vendor) and they will be able to print the canvas order? Thank you SOO much for your help!
Yes, choose a custom crop and type in 11×15. Then export just as you said and upload to Shootproof and you’re done. I don’t offer large sized prints or canvases for direct purchase on Shootproof because large wall prints need additional sharpening to look the best, so they have to order those from me. All of that is detailed in my print guide I send to clients with the gallery.
Thank you so much! So, if I understand, you just set the custom crop on your first print when you are editing and then lock it so they all have the same crop? So, you don’t offer anything larger than 8×10 in your Shootproof . Now, if they want to order 20×30 canvas somewhere, they could do that with the digitals, though right…and not use you? I am just trying to get it all worked out so there is no unhappy moments if they choose to print somewhere on their own. Thank you for your help! This was a great article! So helpful for me
I am still such a newbie to photography (just for fun right now) however, this tioic has been plaguing my mind! Thank you for such great, simple & precise info!
WOW!!!!! What a VERY informative article. I’ve been reading about the aspect ratio issue all over the place. I get it now, but your post here REALLY cemented things and kept it very simple.
I just started delivering digital files to my clients and have also linked that delivery to a high-quality professional printing service (Millers) where they can alacarte order what they want. I JUST started and held my breath on orders… but NOW I will make changes in my shooting, and exporting etc. I also do this part time and have a day job (for now) where I travel a lot and don’t have a lot of time as you described. This all makes perfect sense to me.
Thank you so much for the advice here. I will read this again AND I will subscribe to your site. Thank you,
MR
I’m so glad it was helpful!
Thank you so much for such helpful information, Kate! Quick question: I can’t figure out how to change the aspect ratio (as opposed to changing the size of the photos in inches) in LR. Do you mind sharing how you change from 2:3 to 11:15? I seem to only have the option to change the size in inches…Thank you!
In the develop panel crop tool drop downs, go to “Enter Custom” and you can enter ratios. This lets you crop each image to your liking at that ratio. Then you can specify actual dimensions as needed on export.
Great article! I always sort of cringe thinking of leaving it up to clients to have to crop for different print ratios. Its a tough call to either shoot wide and deliver a gallery or have images cropped the way you want but face a client wanting an incompatie size/ratio. Thank you for the reminder of educating our clients a bit so they get what they want
Perfect article. Thanks for sharing!